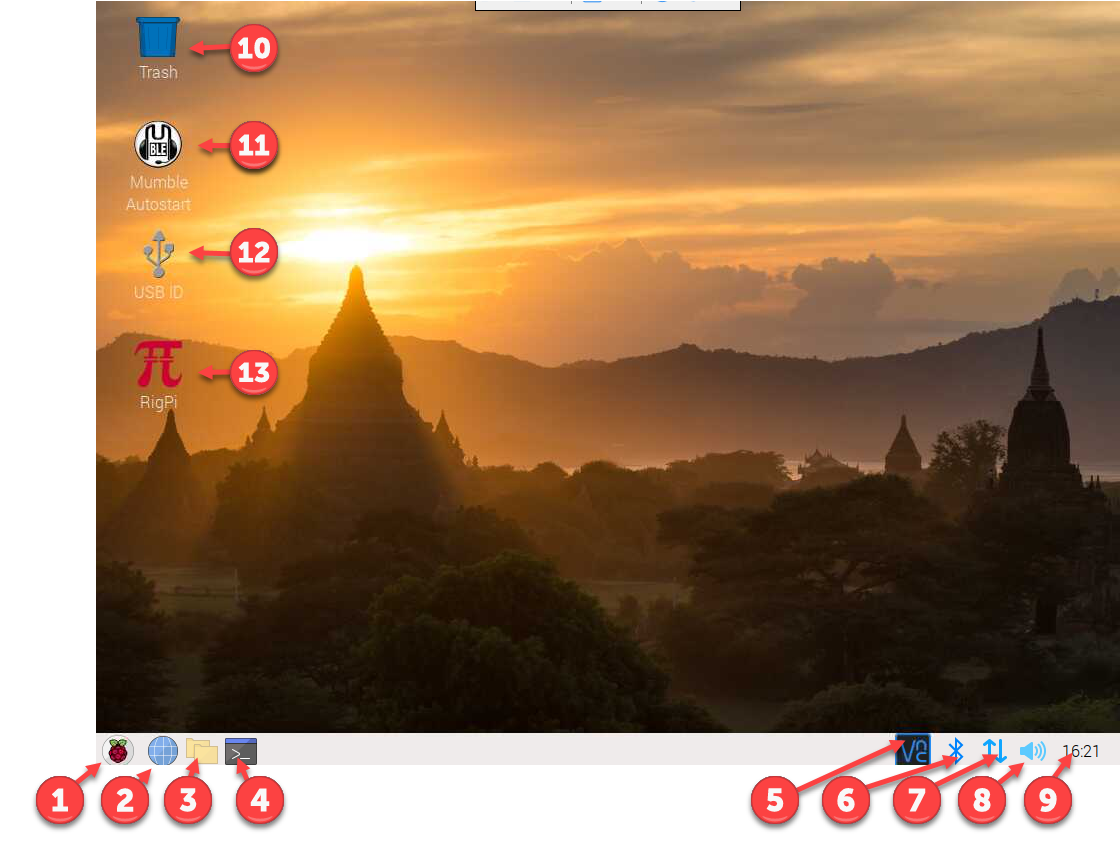
The Raspberry Pi Desktop is similar to many graphics desktops. The Raspberry Menu button in the lower left on the Task Bar is similar to a Windows File menu. Most buttons and icons have a right-mouse menu for additional options. You can access the Desktop by connecting an HDMI monitor to RSS, or by using VNC Viewer to access it from another computer.
The position of the Task Bar can be set to top, bottom, or a side. To change the position (shown at the bottom, above), right-click over the Task Bar and select Panel Settings. In the Panel Preferences window, select the Edge Position you prefer.
|
Function |
Description |
|---|---|---|
1 |
Raspberry |
Applications Menu |
2 |
Web Browser |
Chromium browser |
3 |
File Explorer |
Navigate file system |
4 |
Terminal |
Shell access to RSS |
5 |
VNC |
VNC Server--use VNC Viewer to connect from another computer. |
6 |
Bluetooth |
Bluetooth enabled |
7 |
LAN |
LAN/Wi-Fi active connections |
8 |
Speaker |
Audio enabled |
9 |
Clock |
Local time |
10 |
Trash |
Delete files go here |
11 |
Mumble Autostart |
Control boot behavior of Mumble client. |
12 |
USB IO |
Assign name to USB cable for easy identification. |
13 |
RigPi |
Start RigPi in Chrome browser. It is best to connect to RigPi using an external browser, not the Raspberry Pi browser. By using an external browser the limited resources of the Raspberry Pi can be heloed by sharing the load with another computer. |
Setting up the Raspberry Pi
When you first start RSS you will need to make changes to the Raspberry Pi to adjust to your needs and location. These settings are done through the Applications Menu (1)>Preferences>Raspberry Pi Configuration menu item.
The Configuration window has four tabs at the top: System, Interfaces, Performance, and Localisation (sic).
In the System tab, click the Set Resolution button. Select the resolution appropriate for your monitor.
In Localisation settings change: Locale, Timezone, Keyboard and Wi-Fi Country.
Change the font/icon size relative to the screen using the Appearance Settings in the Preferences menu. Defaults are provided for large, medium and small screens.
Finally, if you want to enable Wi-Fi, click the up/down arrow button (7) on the right side of the RPi menu bar. Left-click, then click Turn On Wi-Fi and follow the instructions.