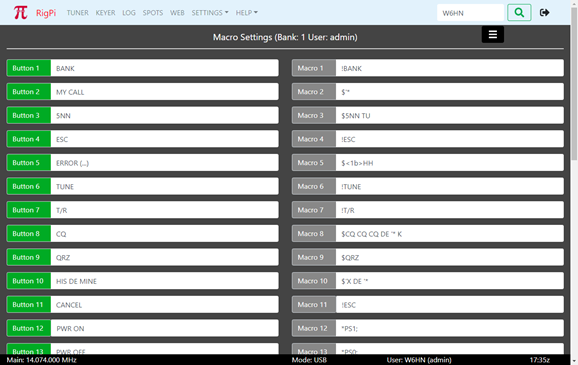
RSS provides 128 programmable macro keys in 4 banks of 32 each. The keys are available in the Tuner and CW Keyer windows. Each macro has a space to enter a button caption and a command. The total length of all macros is 2000 characters per bank per account. Macros can be used in a number of ways:
•CW messages
•Hamlib Commands
•Direct radio commands
•Special commands
Macro Save/Restore
Each bank of macros can be saved and restored. Use the "hamburger" icon button (upper right) to save the current macro bank to the downloads folder or to restore a saved macro bank. The downloads folder is determined by the device or computer you are using to connect to RigPi. If you are using a desktop PC to connect to RigPi, macro banks are sent to the downloads folder on the PC. Select the Restore button to display a file explorer window to find the macro bank file you want to restore.
Macro banks are downloaded as text (.txt) files. You can modify macros in the .txt file using any text editor. The edited macro text file can then be uploaded to replace the current set.
The last-used Macro Bank in the Tuner and Keyer windows are restored when you reopen either window.
CW Messages
CW Messages start with a $ character. The message can consist of ASCII printable characters, special control characters, or a combination of both. RigPi Keyer and External WinKeyer share the same control characters. The control characters are defined in the WinKeyer3 data sheet.
For example, one WinKeyer3 control character, 1bH, is used to combine consecutive characters to create a prosign. The prosign BK is formed by the CW command $<1b>BK. This is a combined ASCII printable and control character CW message.
A printable ASCII message might be $5NN TU for the signal report plus "Thank You."
Special CW keying characters that can be used in a RigPi Keyer or WinKeyer3 macro (prefaced by $):
Character |
Result |
|---|---|
'* |
Your call sign (apostrophe + asterisk) |
'X |
DX call |
<1b>AR |
AR |
<1b>AA |
AA |
<1b>BK |
BK |
<1b>BT |
BT |
<1b>CL |
CL |
<1b>KN |
KN |
<1b>SK |
SK |
<1b>AS |
AS |
<02>number |
Set CW speed to 'number.' To set the speed to 30 wpm, the command is <02>30. Use a value of 0 to set the speed to the last used speed in a stacked speed macro. {<02>30}<02>20 sets the speed to 30 when a stacked speed macro starts and 20 when the second part of the stacked macro is sent. {<02>30}<02>0 sets the speed back to what it was before the macro was started. |
!ESC |
Stops a CW message that is being transmitted or stops the tune mode |
!TUNE |
Key down (tap Tune again, or use ESC or CANCEL macro to stop) |
Hamlib Commands
RSS uses the Hamlib library to control radios and rotors. The library is documented online on the Hamlib developer's web site.
Click to see Hamlib Rigctl commands
The rigctld utility is used for radio commands while the rotctld is used for rotor commands. Preface rigctld and rotctld command with * (asterisk). For example, to create a macro to set the main VFO frequency to 14.222.220 MHz, use the macro *F 14222220. Note the space between the F and 1. Many commands return a value from the radio. For example, the macro *f returns the current main frequency from the radio. Return values are shown in a modal alert box. If an invalid command is used in a macro and error message is displayed.
Direct Radio Commands
A special Hamlib rigctld command, w, is used to send commands to radios when there is no rigctld native command. For example, to set the squelch on an Elecraft KX3 to 50, use the command *0w SQ050. The w command is prefaced by an asterisk and the number 0 or 1. Some radio commands elicit a response, others don't. Use 0 for commands for which the radio doesn't respond and 1 if a response is expected. The command shown in the Macro screen shot sets the frequency of a Kenwood or Elecraft radio to 15 meters. *0w FA00021025000; Commands that return values from the radio show the resulting data in a modal dialog box. For example, *1w FA; returns the current main frequency from Kenwood and Elecraft radios. If an invalid command is used in a w custom command an error message is shown.
Some radios, such as Icom and many Yaesu radios, require the use of hex numbers in w commands. Use the notation \0xNN (NN=a valid hex number) for these radios. Return values will also be hex numbers and may not display in a meaningful way.
Stacking Macros
More than one macro can be inserted in a single macro slot. For example, you can add a mode macro to a frequency set macro. Hamlib and Direct Radio Commands (0w/1w) can be stacked and mixed.
To add a second or additional macros to an existing macro, simply add the command and any command prefixes. Using Hamlib commands to set frequency, mode and passband, use this format:
*F 14222220*M USB 3000
This macro sets the radio frequency to 14.222220 MHz, the Mode to USB and the passband to 30000 Hz. Here are some examples using Hamlib commands:
Command |
What Happens |
Note |
|---|---|---|
*F 14055444*M CW 3000 |
Tune radio to 14.055.444 CW with a passband of 3000 Hz |
Uses Hamlib commands |
*S 1 VFOB*I 14058222 |
Set radio to split mode, transmit on 14058222 |
Uses Hamlib commands |
Latching Macros
Many radio commands set a state such as on and off, or you may wish to program a button that toggles between two frequencies. RigPi Macros use a special format to determine the command for each state and the color used for a button that has been clicked.
{command1}command2+btn-color
The command in '{}' is the first command executed when the button is clicked. This starts a stacked command.
The color determines the color of the button when first clicked.
![]()
If you don't provide a color, "Info" is the default color.
Here are several samples of how to use a Latching Macro.
Button label |
Command |
Notes |
PWR ON/OFF |
{*PS1;}*PS0;+btn-danger |
Button is red ('danger') when power is on. |
HAMLIB TEST (F) |
{*F 21025000}*F 28035000+btn-warning |
Button is yellow ('warning') when frequency is set to 21.025.000 |
|
|
|

Web Commands
Macros can be created to open web sites in a new browser wwindow. Web commands start with the backslash character ("\"). The DX Call, band and mode can be embedded in the command. This is useful for opening QRZ.com to the DX Call, or opening DX Summit filtering on call, band and mode. You can create your own web commands for other sites.
Button label |
Command |
Notes |
QRZ DX CALL |
/https://qrz.com/db/<dxcall> |
Look up 'dxcall' on QRZ |
D XS BAND & MODE |
/http://dxsummit.fi/#/?include=<band>&include_modes=<mode> |
Look up all spots on DX Summit for the current band and mode |
DXS DXCALL |
/http://dxsummit.fi/#/?dx_calls=<dxcall> |
Look up all spots on DX Summit for the current DX call |
Function Key Shortcuts
Assign macros to F-keys for quick access from your keyboard. Use a prefix of Fn: to assign F-key n. F1-F12 can be used. For example,
F1:$5NN TU
assigns F1 to a CW macro that sends 5NN TU.
System Commands
System command macros are disabled by default since they can be a serious security risk. If you aren't careful, you can issue commands that will damage important RSS files. If you wish to experiment, uncomment the exec line in programs/systemExec.php. Be careful! Do NOT enable this function for security reasons if your RSS is accessible from the Internet.
Preface system commands with #. For example, to program a macro to reboot RSS, use the command #sudo reboot.
Other Special Commands
Special '!' commands that can be sent using a macro key include the following:
Command |
What Happens |
|---|---|
!BANK |
Changes Macro Bank to the next higher bank. Starts over after bank 4. Current bank is shown by selected Macro Band button. |
!T/R |
Toggles Transmit/Receive |
!ROTATE |
Turn your station rotor to the DX bearing |
!RTR STOP |
Stop rotor immediately |
!PTTON |
Turns on RigPi Keyer and Audio board PTT. A radio does not have to be connected. If using this to control an external power switch, turn off hardware PTT in Advanced Radio settings>H/W PTT. |
!PTTOFF |
Turns off RigPi Keyer and Audio board PTT. A radio does not have to be connected. If using this to control an external power switch, turn off hardware PTT in Advanced Radio settings>H/W PTT. |
!SWn |
The the !SWn command, macros can control on and off to up to 8 external devices through a special cable (see below). (Use !SW0 to reset all 8 lines.) |
!TUNER |
Engage internal tuner in radio. |
!TUNETO |
A dialog allows you to set a frequency, mode and bandwidth. |
Switching External Devices
Using the !SWn macro RigPi can control up to 8 external devices that can be turned on or off with 5-volt signals. For example, !SW1 can be used to turn on and off device 1. The macro latches the current value, so successive taps turn the device on and off. Use !SW0 to reset all eight outputs.
This function requires a special USB cable:
FTDI C232HM (C232HM-EDHSL-0). This cable has 10 wires that can be used for interfacing to other devices. The FTDI cable can be purchased from Mouser Electronics.
Wire |
Signal |
|---|---|
Red |
VCC |
Orange |
BIT/PIN 0 |
Yellow |
BIT/PIN 1 |
Green |
BIT/PIN 2 |
Brown |
BIT/PIN 3 |
Grey |
BIT/PIN 4 |
Purple |
BIT/PIN 5 |
White |
BIT/PIN 6 |
Blue |
BIT/PIN 7 |
Black |
GND |
IC-7610/IC-7300 Macros (tnx KK5VG)
Macro |
HEX COMMANDS |
|
|
IC-7610 ON |
*1w \0xFE\0xFE\0x98\0xE0\0x18\0x01\0xFD |
IC-7610 OFF |
*1w \0xFE\0xFE\0x98\0xE0\0x18\0x00\0xFD |
NOISE REDUCTION ON |
*1w \0xFE\0xFE\0x98\0xE0\0x16\0x40\0x01\0xFD |
NOISE REDUCTION OFF |
*1w \0xFE\0xFE\0x98\0xE0\0x16\0x40\0x00\0xFD |
NOISE REDUCTION LEVEL 2 |
*1w \0xFE\0xFE\0x98\0xE0\0x14\0x06\0x40\0xFD |
NOISE REDUCTION LEVEL 6 |
*1w \0xFE\0xFE\0x98\0xE0\0x14\0x06\0x1\0x10\0xFD |
ROTOR |
|
ROTOR STOP |
|
NOTCH ON |
*1w \0xFE\0xFE\0x98\0xE0\0x016\0x41\0x01\0xFD |
NOTCH OFF |
*1w \0xFE\0xFE\0x98\0xE0\0x016\0x41\0x00\0xFD |
COMPRESSION ON |
*1w \0xFE\0xFE\0x98\0xE0\0x016\0x44\0x01\0xFD |
COMPRESSION OFF |
*1w \0xFE\0xFE\0x98\0xE0\0x016\0x44\0x00\0xFD |
PREAMP OFF |
*1w \0xFE\0xFE\0x98\0xE0\0x016\0x02\0x00\0xFD |
PREAMP 10 |
*1w \0xFE\0xFE\0x98\0xE0\0x016\0x02\0x01\0xFD |
PREAMP 20 |
*1w \0xFE\0xFE\0x98\0xE0\0x016\0x02\0x02\0xFD |
CHANGE MAIN / SUB |
*1w \0xFE\0xFE\0x98\0xE0\0x07\0xB0\0xFD |
ATTENUATOR OFF |
*1w \0xFE\0xFE\0x98\0xE0\0x11\0x00\0xFD |
ATTENUATOR 6 DB |
*1w \0xFE\0xFE\0x98\0xE0\0x11\0x06\0xFD |
ATTENUATOR 12 DB |
*1w \0xFE\0xFE\0x98\0xE0\0x11\0x12\0xFD |
ATTENUATOR 18 DB |
*1w \0xFE\0xFE\0x98\0xE0\0x11\0x18\0xFD |
VFO |
*1w \0xFE\0xFE\0x98\0xE0\0x07\0xFD |
MEMORY |
*1w \0xFE\0xFE\0x98\0xE0\0x08\0xFD |
ANTENNA 1 |
*1w \0xFE\0xFE\0x98\0xE0\0x12\0x0000\0xFD |
ANTENNA 2 |
*1w \0xFE\0xFE\0x98\0xE0\0x12\0x0001\0xFD |
RF -30%****************** |
*1w \0xFE\0xFE\0x98\0xE0\0x14\0x02\0x2\0x20\0xFD (???) |
RF -50%****************** |
*1w \0xFE\0xFE\0x98\0xE0\0x14\0x02\0x1\0x90\0xFD (???) |
RF 100%****************** |
*1w \0xFE\0xFE\0x98\0xE0\0x14\0x02\0x2\0x55\0xFD (???) |
14.300 Mhz |
*F 14300000 |
50.525 Mhz |
*F 50525000 |
MONITOR ON |
*1w \0xFE\0xFE\0x98\0xE0\0x16\0x45\0X01\0xFD |
MONITOR OFF |
*1w \0xFE\0xFE\0x98\0xE0\0x16\0x45\0X00\0xFD |
RESET |
|
|
|
NOISE BLANKER ON |
*1w \0xFE\0xFE\0x98\0xE0\0x16\0x22\0x01\0xFD |
NOISE BLANKER OFF |
*1w \0xFE\0xFE\0x98\0xE0\0x16\0x22\0x00\0xFD |
|
|
DUAL WATCH ON |
*1w \0xFE\0xFE\0x98\0xE0\0x7\0xC1\0xFD |
DUAL WATCH OFF |
*1w \0xFE\0xFE\0x98\0xE0\0x7\0xC0\0xFD |
|
|
PBT IN +150 |
*1w \0xFE\0xFE\0x98\0xE0\0x14\0x08\0x01\0x55\0xFD |
PBT OUT -150 |
*1w \0xFE\0xFE\0x98\0xE0\0x14\0x08\0x1\0x00\0xFD |
PBT IN .0 |
*1w \0xFE\0xFE\0x98\0xE0\0x14\0x07\0x01\0x30\0xFD |
PBT OUT .0 |
*1w \0xFE\0xFE\0x98\0xE0\0x14\0x08\0x01\0x30\0xFD |
|
|
COMPRESSION LEVEL 3 |
*1w \0xFE\0xFE\0x98\0xE0\0x14\0x0E\0X00\0x0270\0xFD |
COMPRESSION LEVEL 5 |
*1w \0xFE\0xFE\0x98\0xE0\0x14\0x0E\0X01\0x0220\0xFD |
COMPRESSION LEVEL 7 |
*1w \0xFE\0xFE\0x98\0xE0\0x14\0x0E\0X01\0x0265\0xFD |
COMPRESSION LEVEL 10 |
*1w \0xFE\0xFE\0x98\0xE0\0x14\0x0E\0X02\0x055\0xFD |
|
|
RF POWER 8W |
*1w \0xFE\0xFE\0x98\0xE0\0x14\0x0A\0x00\0x21\0xFD |
RF POWER 25W |
*1w \0xFE\0xFE\0x98\0xE0\0x14\0x0A\0x00\0x65\0xFD |
RF POWER 50W |
*1w \0xFE\0xFE\0x98\0xE0\0x14\0x0A\0x01\0x30\0xFD |
RF POWER 75W |
*1w \0xFE\0xFE\0x98\0xE0\0x14\0x0A\0x01\0x93\0xFD |
RF POWER 100W |
*1w \0xFE\0xFE\0x98\0xE0\0x14\0x0A\0x02\0x55\0xFD |
|
|
MIC GAIN 25% |
*1w \0xFE\0xFE\0x98\0xE0\0x14\0x0B\0x00\0x0165\0xFD |
MIC GAIN 50% |
*1w \0xFE\0xFE\0x98\0xE0\0x14\0x0B\0x01\0x0230\0xFD |
MIC GAIN 75% |
*1w \0xFE\0xFE\0x98\0xE0\0x14\0x0B\0x01\0x0193\0xFD |
MIC GAIN 100% |
*1w \0xFE\0xFE\0x98\0xE0\0x14\0x0B\0x02\0x0055\0xFD |
|
|
AGC SLOW |
*1w \0xFE\0xFE\0x98\0xE0\0x16\0x12\0x03\0xFD |
AGC MID |
*1w \0xFE\0xFE\0x98\0xE0\0x16\0x12\0x02\0xFD |
AGC FAST |
*1w \0xFE\0xFE\0x98\0xE0\0x16\0x12\0x01\0xFD |
|
|
MANUAL NOTCH - ON |
*1w \0xFE\0xFE\0x98\0xE0\0x16\0x48\0x01\0xFD |
MANUAL NOTCH - OFF |
*1w \0xFE\0xFE\0x98\0xE0\0x16\0x48\0x00\0xFD |
MANUAL NOTCH WIDTH - WID |
*1w \0xFE\0xFE\0x98\0xE0\0x16\0x57\0x00\0xFD |
MANUAL NOTCH WIDTH - MID |
*1w \0xFE\0xFE\0x98\0xE0\0x16\0x57\0x01\0xFD |
MANUAL NOTCH WIDTH - NAR |
*1w \0xFE\0xFE\0x98\0xE0\0x16\0x57\0x02\0xFD |
|
|
MACRO |
HAMLIB COMMANDS |
IC-7610 ON |
*PS1; |
IC-7610 OFF |
*PS0; |
NOISE REDUCTION ON |
*U NR 1 |
NOISE REDUCTION OFF |
*U NR 0 |
NOISE REDUCTION LEVEL 2 |
*L NR .2 |
NOISE REDUCTION LEVEL 6 |
*L NR .6 |
ROTOR |
!ROTATE |
ROTOR STOP |
!RTR STOP |
NOTCH ON |
*U ANF 1 |
NOTCH OFF |
*U ANF 0 |
COMPRESSION ON |
*U COMP 1 |
COMPRESSION OFF |
*U COMP 0 |
PREAMP OFF |
*L PREAMP 0 |
PREAMP 10 |
*L PREAMP 10 |
PREAMP 20 |
*L PREAMP 20 |
CHANGE MAIN / SUB |
|
ATTENUATOR OFF |
*L ATT 0 |
ATTENUATOR 6 DB |
*L ATT 6 |
ATTENUATOR 12 DB |
*L ATT 12 |
ATTENUATOR 18 DB |
*L ATT 18 |
VFO |
*V VFO |
MEMORY |
*V MEM |
ANTENNA 1 |
*A 0 |
ANTENNA 2 |
*A 1 |
RF -30% |
*L RF .26 |
RF -50% |
*L RF .51 |
RF 100% |
*L RF 1.0 |
14.300 Mhz |
*F 14300000*M USB 2500 |
50.525 Mhz |
*F 50525000*M USB 2500 |
MONITOR ON |
*U MON 1 |
MONITOR OFF |
*U MON 0 |
RESET |
|
RESET IS A LIST OF COMMANDS (IN ONE MACRO) THAT CLOSE THE COMMANDS THAT I MIGHT HAVE OPENED. |
*U COMP 0*U NR 0*V VFO*ANF 0*L RF 1.0*U MON 0*A 1*L PREAMP 0*L ATT 0*Y 1*U NB 0*U DUAL_WATCH 0*L PBT_IN .50*L PBT_OUT .50*L MICGAIN .51*U MN 0*L RFPOWER 1.0*L AGC 5 |
|
|
NOISE BLANKER ON |
*U NB 1 |
NOISE BLANKER OFF |
*U NB 0 |
|
|
DUAL WATCH ON |
*U DUAL_WATCH 1 |
DUAL WATCH OFF |
*U DUAL_WATCH 0 |
|
|
PBT IN +150 |
*L PBT_IN .60 |
PBT OUT -150 |
*L PBT_OUT .60 |
PBT IN .0 |
*L PBT_IN .50 |
PBT OUT .0 |
*L PBT_OUT .50 |
|
|
COMPRESSION LEVEL 3 |
*L COMP .3 |
COMPRESSION LEVEL 5 |
*L COMP .5 |
COMPRESSION LEVEL 7 |
*L COMP .7 |
COMPRESSION LEVEL 10 |
*L COMP 1.0 |
|
|
RF POWER 8W |
*L RFPOWER .08 |
RF POWER 25W |
*L RFPOWER .26 |
RF POWER 50W |
*L RFPOWER .51 |
RF POWER 75W |
*L RFPOWER .76 |
RF POWER 100W |
*L RFPOWER 1.0 |
|
|
MIC GAIN 25% |
*L MICGAIN .26 |
MIC GAIN 50% |
*L MICGAIN .51 |
MIC GAIN 75% |
*L MICGAIN .76 |
MIC GAIN 100% |
*L MICGAIN 1.0 |
|
|
AGC SLOW |
*L AGC 3 |
AGC MID |
*L AGC 5 |
AGC FAST |
*L AGC 2 |
|
|
MANUAL NOTCH - ON |
*U MN 1 |
MANUAL NOTCH - OFF |
*U MN 0 |
MANUAL NOTCH WIDTH - WID |
|
MANUAL NOTCH WIDTH - MID |
|
MANUAL NOTCH WIDTH - NAR |
|
|
|